
WaitApp Configuration & Setup
Contents
Turn off Windows Updates in Windows 10 9
content.meteoblue.com/en/what-we-offer/widget 13
eReaderUtilities new efatures 15
eReader User’s Guide
This installation guide will lead you thru the steps required for preparation of computer stick (Intel Compute Stick, Lenovo™ ideacentre™ Stick 300, InFocus Kangaroo Signature Edition Mobile Desktop …) or dedicated PC which is dedicated to in-house marketing or digital signature with Windows 10 installed.
Installation
To install eReader:
1 – download it from www.exnp.com/downloads/eReader/EXNPeReader.application
2 – Review “Licensing Agreement” and accept it in order to proceed
3 – Import registration keys (enter “Registered Name”, click Import and point to “.TML” file). If you do not have registration keys click, Contact us and request registration keys.
4 – Add content to the DEFAULT configuration and configure it (more details in CONFIGURATION section below)
5– Create as many configurations as required and configure them accordingly (more details is MULTIPLE CONFIGURATIONS section below)
6 – If eReader is running on Intel Compute Stick or equivalent (InFocuse Kangaroo, LENOVO IdeaCentre 300 …) review WINDOWS CONFIGURATION section below and adjust applicable parameters for Windows 10.
CONFIGURATION
Every window displayed has separate configuration. Every installation must have at least one configuration defined (DEFAULT).
Configuration parameters are:

Double click currently displayed picture and screen similar to this one will open. By adjusting values of the fields or add / delete files from the list of files you can modify look and feel as well as content of the application.
| CONFIGURATION | Drop down list with at least one item (DEFAULT). You can define multiple configurations and properties for every configuration are stored separately.
By default, eReader will start DEFAULT configuration. If you want to start eReader with different configuration create shortcut to the eReader and specify configuration as startup parameter CONFIGURATION:<configuration_name> |
| NEW | Allows creation of the new configuration from scratch or by cloning existing configuration. |
| CONTENT | |
| SLIDE FREQUENCY | Determines how long one slide will remain on the screen before replaced with another one. |
| LOCAL | Contains path to the folder where content which is not downloaded from the web is stored (local content). If content source is EXNP cloud you have to have ownCloud installed (details below) |
| WEB | Contains hyperlink to the location where file with pointers to the web content is located (web content) |
| AUTO UPDATE | If checked, all files within specified folder will be checked for changes (file deleted, updated or modified) every 60 seconds and displayed content will be updated accordingly. If unchecked, content will be updated only after Properties screen Save button is clicked or after eReader restart. |
| WINDOW | |
| BACK COLOR | If content displayed is not covering entire window BACK COLOR will be color of the empty space. |
| FRAME COLOR | If PADDING is greater than zero frame around slides and ticker, if visible will have value selected here. |
| PADDING | Frame thickness in pixels. |
| MAXIMIZED | If unchecked, eReader height and width will have values provided in Height and Width fields, respectively. If checked, size of the eReader window will be the same as screen size. |
| SIZABLE | If checked, eReader window will have frame, title and you will be able to resize it and to relocate it. |
| TOP MOST | If checked, window will be always top most window. |
| TICKER | |
| HIDE | If checked ticker will not be visible. |
| DISPLAY STYLE | If text is not hidden, it will appear as single line with characters disappearing on the left hand size and being added in the right hand side (CONTINUOUS), line by line will be presented as line built from line characters (LINE SLIDE) or lines will be displayed one after the either with time delay defined by TEXT FREQUENCY (WHOLE LINE) |
| TEXT FREQUENCY | Defines time delay between characters for CONTINUOUS and LINE SLIDE DISPLAY STYLE or how long line will be displayed for WHOLE LINE. |
| FONT …. | FONT, FONT SIZE, TEXT COLOR and TEXT BACKCOLOR are text font attributes |
| TEXT | Ticker content |
| PASSWORD | You can password protect modification of the parameters (minimum 6 characters). If you assign password next time you will have to enter password before properties screen will open. |
Bottom of the screen shows all files on the local machine which will be displayed as slides for selected configuration.
| Add | Click to “Add” button to add file to add existing file to the directory where all files reside or to create “xlsx” or “docx” file |
| Open | Show selected file or open for editing “xlsx” or “docx” file |
| Delete | Delete selected file |
| Properties | Show file properties of the selected file (Size, Date Modified ….) |
| Data Stamp | Set time frame within which file will be displayed |
NOTE:
If context of the slides and / or videos is synchronized from the EXNP cloud, ownCloud client must be installed and configured, as follows:
1 – Download ownCloud client from https://owncloud.org/install/#install-clients
2 – Install SW using default parameters
3 – At the end of the installation you will be prompted for the server URL, which is https://excldmain.exnp.com
4 – Enter user name and the password provide by EXNP
5 – ownCloud client will download content of the linked folders from the server
Multiple Configurations
To create another configuration you can do it from eReader or Windows Explorer:
eReader
- Open eReader and click New button
- Name new configuration and close the window;
- Select configuration you have just created, make WINDOW SIZABLE and define configuration parameters;
- Position window and resize it
- Uncheck SIZABLE check box configuration parameter
- Click Save
Windows Explorer
- Open Windows Explorer
- Navigate to C:\EXNP\eReader folder
- Make copy of the DEFAULT folder
- Rename copy to have configuration name you want to create
- Open eReader from the desktop shortcut
- Open Properties, select Configuration you want to edit, check SIZABLE and click Save
- Position window where you want it to be on the TV or monitor
- Click on the slide and Properties will popup
- Change source of the local content or web content
- Uncheck Sizable and click Save
To run multiple configuration simultaneously:
- Click Startup
- Click Clear button and Yes when prompted to empty startup batch
- Click Yes when prompted if you want to create startup batch
- All configurations you have defined will be listed there
- Remove those, if any, you do not want displayed after next restart
- Click Save
- Restart machine SW is running on
WINDOWS CONFIGURATION
To enable automatic start / restart and adjust Windows setting which are relevant to uninterrupted performance of eReader the following steps are recommended:
Enable auto log, adjust display parameters, disable notifications and disable Windows updates.
Auto log
Logon to the computer without having to type a user name or password. That way you do not have to login every time you restart computer.
In the Search box, type control userpasswords2, and then press ENTER. ![]() If you are prompted for an administrator password or confirmation, type the password or provide confirmation.
If you are prompted for an administrator password or confirmation, type the password or provide confirmation.
Clear the Users must enter a user name and password to use this computer check box, and then click Apply.
In the Automatically Log On dialog box, type your password, and then click OK.
In the User Accounts dialog box, click OK.
After you restart your computer, you will be able to log on automatically.
Display
One or more instances of the eReader will be running in the desktop. Therefore, it is important to have desktop background, colors and other parameters set properly.
Right click anywhere on the desktop and select “Personalized”.
To adjust visual elements of the desktop, go to Themes, Background and Colors. If you just want to have plain white background all you have to do is to go to Themes, Theme Settings and under “High Contrast Themes” select “High Contrast White”.
NOTE: Make sure that taskbar is not locked and present all the time after system starts. To adjust Taskbar behaviour:
|

Hide
Setting
To disable notification and make other adjustment:
- Click Start and click Settings
- Click System

- Select Display and make adjustments, if required. Note, if stick is attached to the TV no adjustments are necessary.
- Select Notifications & action and disable all notifications. Enable Hide notifications while presenting
- Apps & features you can skip but it’s recommended that you remove all applications that you recognize as those you are not going to use on the stick. That way you will save some space and in some cases enhance performance. If you are not sure what to do, do not uninstall anything.
- Multitasking and Tablet mode you can skip
- Battery saver if visible you can skip too
- Select Power & Sleep and set When plugged in, turn off after and When plugged in, PC goes to sleep after to
 Click Additional power settings and select Maximum Performance. Close Power Options window.
 - Storage you can skip.
- Select Offline maps and make sure that Metered connections and Map updates are set to Off
Add TV
CBC – Google Chrome
1 – Subscribe to
2 – Save the following script at c:\EXNP\eReader\loginPage.html
<body onload=“frameRefresh()”>
<iframe name=“loginFrame” id=“loginFrame” scrolling=“no” src=“https://insinc.neulion.com/cbc/secure/loginform” frameborder=“0” height=“250px” width=“100%”></iframe>
</body>
<script>
function frameRefresh()
{
var ifr = document.getElementById(“loginFrame”);
var ifrDoc = ifr.contentDocument || ifr.contentWindow.document;
var theForm = ifrDoc.getElementById(“loginForm”);
theForm.method = “post”;
//theForm.action = “xyz.pl”;
theForm.target = “loginFrame”;
theForm[0].value = <user_name>;
theForm[1].value = <password>;
ifrDoc.getElementsByClassName(“submit_btn”)[0].click();
}
</script>
</html>
3 – Install Google Chrome
4 – Do the following setup changes
- Add extension Allow-Control-Allow-Origin…
- Disable popup blocker
5 – Install “Super Auto Refresh” ad on and set it to 60 minutes
Disable Popup blocker
By default, Chrome will notify you when a pop-up is blocks and give you an option to see it. To turn off pop-up blocker, follow these instructions:
- Click the Customize and control Google Chrome menu (the three horizontal bars in the upper right corner)
- Select Settings.
- Click the Show advanced settings… at the bottom.
- Under Privacy, click the Content Settings button.
- To disable the pop-up blocker check the Allow all sites to show pop-ups box.
- To enable pop-ups on specific sites, check Do not allow any site to show pop-ups (recommended) and click Exceptions and enter the URL(s).
Manual Date Stamp
(F230617-T290617-D)
Turn off Windows Updates in Windows 10
Disable all of this
Windows Updates
Windows Installer
Background Intelligent Transfer Service
Cryptographic Service
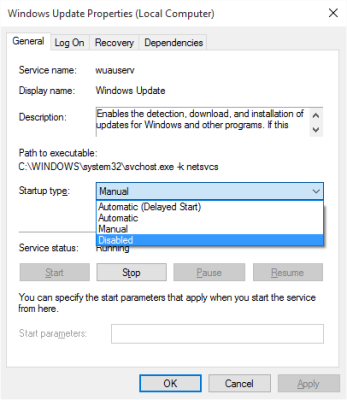
You can do this using the Windows Update service. Via Control Panel > Administrative Tools, you can access Services. In the Services window, scroll down to Windows Update and turn off the process. To turn it off, right-click on the process, click on Properties and select Disabled. That will take care of Windows Updates not being installed on your machine.
But since Windows is a Service now onwards, you have to keep your computer updated. To be able to install the next set of features or a newer build, you will require the earlier updates to be installed. That’s why if you use the above workaround, you will have to go to the Services and turn it on once in a while to download and update your copy of Windows.
Disable all of this
Windows Installer
Background Intelligent Transfer Service
Cryptographic Service
Disable ownCloud
https://forum.owncloud.org/viewtopic.php?t=14014
Chrome Setup – CBC News
Install Autofit
https://chrome.google.com/webstore/detail/autofill/nlmmgnhgdeffjkdckmikfpnddkbbfkkk?hl=en
chrome.google.com
Autofill
Form autofill on steroids.
Script
### AUTOFILL PROFILES ###,,,,,,
Profile ID,Name,Site,Hotkey,,,
c1,cbc,insinc.neulion.com/cbc/secure/loginform,,,,
### AUTOFILL RULES ###,,,,,,
Rule ID,Type,Name,Value,Site,Mode,Profile
r1,0,”td.loginField > input[name=““username”“][type=““text”“]:first-child”,”mdmdixie”,”“,0,c1
r2,1,”^password$”,”2200MDMdixie”,”“,0,c1
r3,4,”“,”document.querySelector(‘.submit_btn’).click();”,”“,0,c1
### AUTOFILL OPTIONS ###,,,,,,
advanced,”[]”,,,,,
exceptions,”[]”,,,,,
backup,0,30,,,,
manual,0,,,,,
delay,0,1,,,,
labelmatch,0,,,,,
overwrite,0,,,,,
vars,1,,,,,
sound,1,,,,,
voice,0,1,,,,
debug,0,,,,,
mask,1,,,,,
scale,1,,,,,
menu,1,,,,,
autoimport,0,,,,,
Link for Startup
start ““ “C:\Program Files\Google\Chrome\Application\chrome.exe” –start-fullscreen https://insinc.neulion.com/cbc/secure/loginform
In chrome type in
then search for flash
then disable the epemeral whatever
CBC – eReader Component
| Installer |
1 – Install Flash
https://get.adobe.com/flashplayer/otherversions/
Adobe Flash Player Install for all versions
Download free Adobe Flash Player software for your Windows, Mac OS, and Unix-based devices to enjoy stunning audio/video playback, and exciting gameplay.
2 – Paste this into javascript box in properties
var theForm = document.getElementById(“loginForm”);
theForm.method = “post”;
theForm.target = “_self”;
theForm[0].value = “<user_name>”;
theForm[1].value = “<password>”;
document.getElementsByClassName(“submit_btn”)[0].click();
window.location.href = ‘https://insinc.neulion.com/cbc/livestream’;
New installation location is:
*%USERPROFILE%\AppData\Local\eReader*
3 – to CBC url:
https://insinc.neulion.com/cbc/secure/loginform
goes into the WEB path
Leave local blank
Set timer at the top to 0 for never refresh or 1800 for once in a while
TheWeather.com
1 – Create widget at https://www.theweather.net/widget/?gclid=CjwKCAjwwo7cBRBwEiwAMEoXPP9-qF9NcNQ0tS1jbJVeYOUIc0bapxB8YajqN09fPe0dAsgxU5wyMxoCKZ4QAvD_BwE
2 – Get code and insert it into by replacing “Mississauga” widget
Theweather.net
<!DOCTYPE html>
<html>
<head>
<title>Weather widget</title>
</head>
<body>
<div id=“cont_eb33dcc39b39d71f545733c397886228”><script type=“text/javascript” async src=“https://www.theweather.net/wid_loader/eb33dcc39b39d71f545733c397886228”></script></div>
</body>
</html>
Weatherwidget.io
<a class=“weatherwidget-io” href=“https://forecast7.com/en/43d59n79d64/mississauga/” data-label_1=“MISSISSAUGA” data-label_2=“WEATHER” data-theme=“retro-sky” >MISSISSAUGA WEATHER</a>
<script>
!function(d,s,id){var js,fjs=d.getElementsByTagName(s)[0];if(!d.getElementById(id)){js=d.createElement(s);js.id=id;js.src=’https://weatherwidget.io/js/widget.min.js’;fjs.parentNode.insertBefore(js,fjs);}}(document,’script’,’weatherwidget-io-js’);
</script>
DarkSkyes
Acuweather.com
PROBLEM WITH LOADING
<a href=“https://www.accuweather.com/en/ca/mississauga/l5t/current-weather/55071” class=“aw-widget-legal”>
<!–
By accessing and/or using this code snippet, you agree to AccuWeather’s terms and conditions (in English) which can be found at https://www.accuweather.com/en/free-weather-widgets/terms and AccuWeather’s Privacy Statement (in English) which can be found at https://www.accuweather.com/en/privacy.
–>
</a><div id=“awtd1535397052256” class=“aw-widget-36hour” data-locationkey=“55071” data-unit=“c” data-language=“en-us” data-useip=“false” data-uid=“awtd1535397052256” data-editlocation=“false”></div><script type=“text/javascript” src=“https://oap.accuweather.com/launch.js”></script>
content.meteoblue.com/en/what-we-offer/widget
<iframe src=“https://www.meteoblue.com/en/weather/widget/three/mississauga_canada_6075357?geoloc=fixed&nocurrent=0&noforecast=0&days=4&tempunit=CELSIUS&windunit=KILOMETER_PER_HOUR&layout=image” frameborder=“0” scrolling=“NO” allowtransparency=“true” sandbox=“allow-same-origin allow-scripts allow-popups allow-popups-to-escape-sandbox” style=“width: 460px;height: 615px”></iframe><div><!– DO NOT REMOVE THIS LINK –><a href=“https://www.meteoblue.com/en/weather/forecast/week/mississauga_canada_6075357?utm_source=weather_widget&utm_medium=linkus&utm_content=three&utm_campaign=Weather%2BWidget” target=“_blank”>meteoblue</a></div>
3-Save as file with .html extension
Clock Widget
https://www.timeanddate.com/clocks/free.html
https://help.twitter.com/en/using-twitter/embed-twitter-feed
AFTER INSTALL
app/data/local/exnp inc/eReader/VCS folder kada ga uninstall
Changes
Licensing
Can change:
1 – if there are no license keys registered
-maximized is not forced;
-in properties window CONFIGURATION drop down is disabled as well as buttons related to configuration.
That way
Sample Configurations
1 – create folder eReaderSampleConfigurations and stroe all backups ready for download (ebkx – files)
2 – Create file with all configuratiosn
Name,Description
Location https://www.exnp.com/eReaderConfigurations/
Configurations.xlsx – list of all configurations
And within
https://www.exnp.com/eReaderConfigurations/images/ (for config images)
https://www.exnp.com/eReaderConfigurations/configurations (site with more details about configuration)
Configuration should be registered in Configurations.xslx file. Name schema:
Name – QuickStart-<NoPanels><-panelAbbriviation1>…<-panelAbbriviationx>
DEMO<francise>-<NoPanels><-panelAbbriviation1>…<-panelAbbriviationx>
Every name must have the same name “.png” file in images folder with screen outline and “.ebkx” with compressed backup in configurations folder
eReaderUtilities new efatures
File Upload
If file has ZIP extension uncompress and do individual files
If file is http or https downola file and process it
New Web Pages on CTVScreen
Quick Setup
If you have IntelCompute Stick or similar device or PC with Windows 10 which you want to use as digital sign
Download EXNP eReader
Download TeamViewer HOST
Fill a form
If you do not need assistance
Prepare images (png, gif, tiff, svg, jpg, jpeg..), videos (mp4) or files
(pdf,docx, xslx or html) with content you want digital sign to display.
Group them into as many folders as you want TV to be divided into. Number of panels is not limited and typical configurations you can find here (link to typical configurations)
Download EXNP eReader
New version
CBC
1 – Install version form https://exdpm.blob.core.windows.net/ereader/Setup.exe
2 – Flash from here https://get.adobe.com/flashplayer/otherversions/
3 – Paste this into javascript box in properties
var theForm = document.getElementById(“loginForm”);
theForm.method = “post”;
theForm.target = “_self”;
theForm[0].value = “[email protected]”;
theForm[1].value = “lboo5650”;
document.getElementsByClassName(“submit_btn”)[0].click();
window.location.href = ’https://insinc.neulion.com/cbc/livestream’; (edited)
*Obviously replace username and password* (edited)
4 – And obviously CBC url:
http://insinc.neulion.com/cbc/secure/loginform
goes into the WEB path
5 – New installation location is:
*%USERPROFILE%\AppData\Local\eReader*
TV
Germany
https://www.ardmediathek.de/tv/live?kanal=5878
https://www.welt.de/tv-programm-live-stream/
https://de.euronews.com/live
start ““ “C:\Program Files (x86)\Google\Chrome\Application\chrome.exe” –start-fullscreen https://www.n-tv.de/mediathek/livestream/ -incognito